Read the diagram from the operator’s position
Use the rider’s view: left and right are the rider’s left and right when seated and facing forward. The source shows motorcycles and a three-wheeled example; identify a component by its function and position, not by the vehicle’s colour or body shape.
The numbered diagram describes the illustrated geared motorcycle. The manual also names an electric scooter in its scope, but does not provide a separate scooter control table or operating procedure. Do not assume every scooter has the illustrated clutch, gear lever or foot brake.
Recognise the main motorcycle components
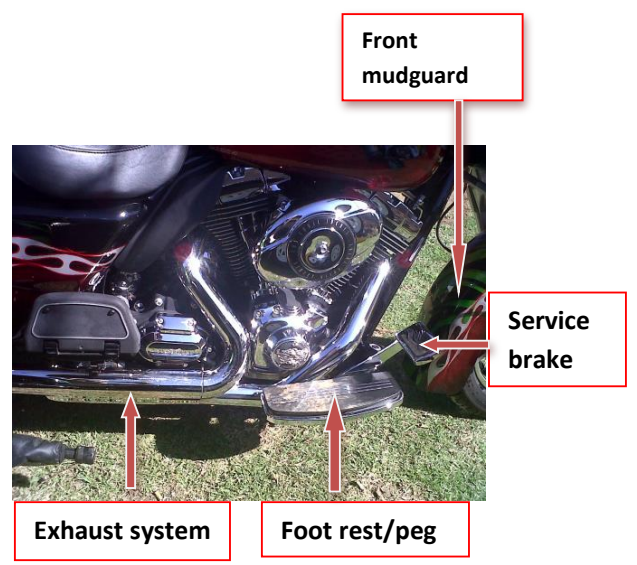
The engine is below the fuel tank. The fuel tank is in front of the seat, while the seat supports the rider. The gear lever is near the rider’s foot. The footrest or foot peg supports the foot; it is not the gear lever or service-brake control.
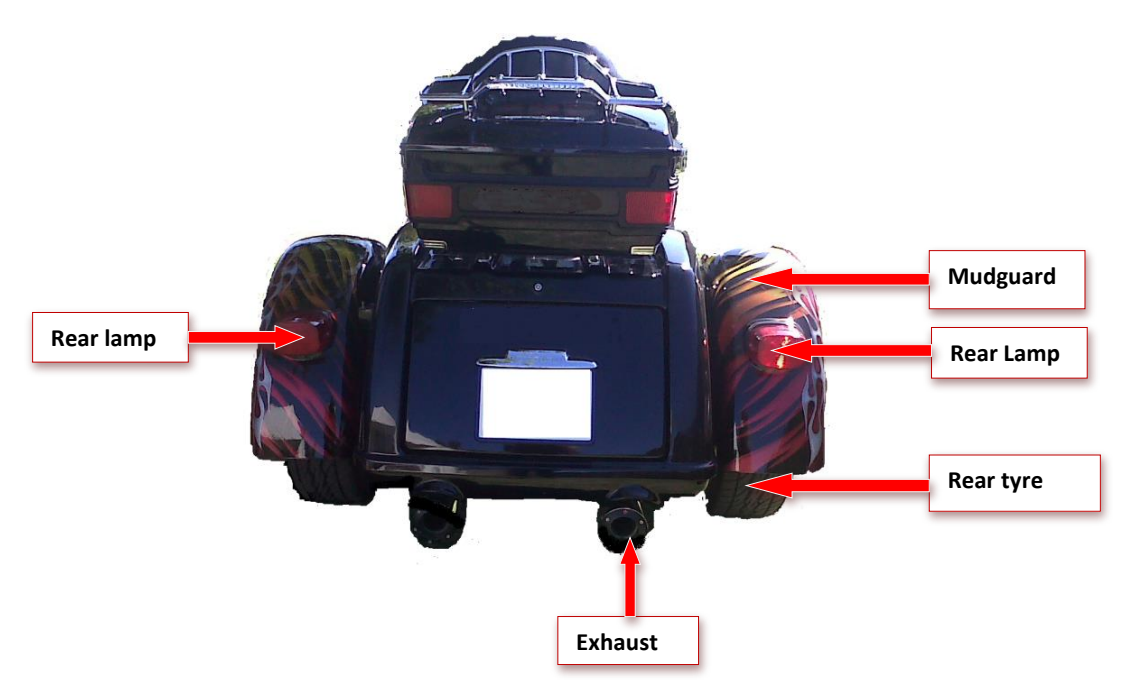
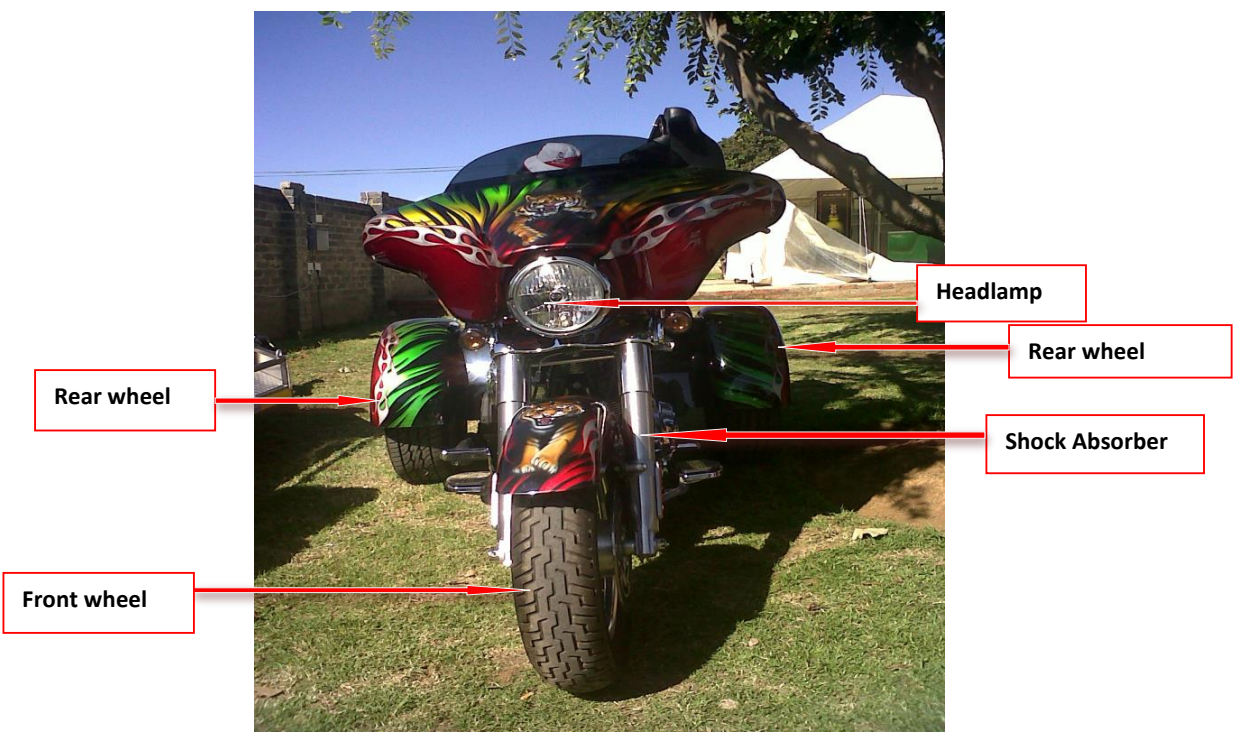
Distinguish the front wheel and tyre from the rear wheel and tyre. The mudguards lie above the wheels. The front view identifies the shock absorber beside the front wheel and the headlamp above it. The rear view identifies rear lamps, rear mudguards and the rear tyre.
The exhaust system and silencer are shown along the side or at the rear. Identify them separately from the footrest, gear lever and service brake. The reference photographs show different vehicle shapes; use the labelled component, rather than memorising the outline of one motorcycle.



Instruments and starting controls
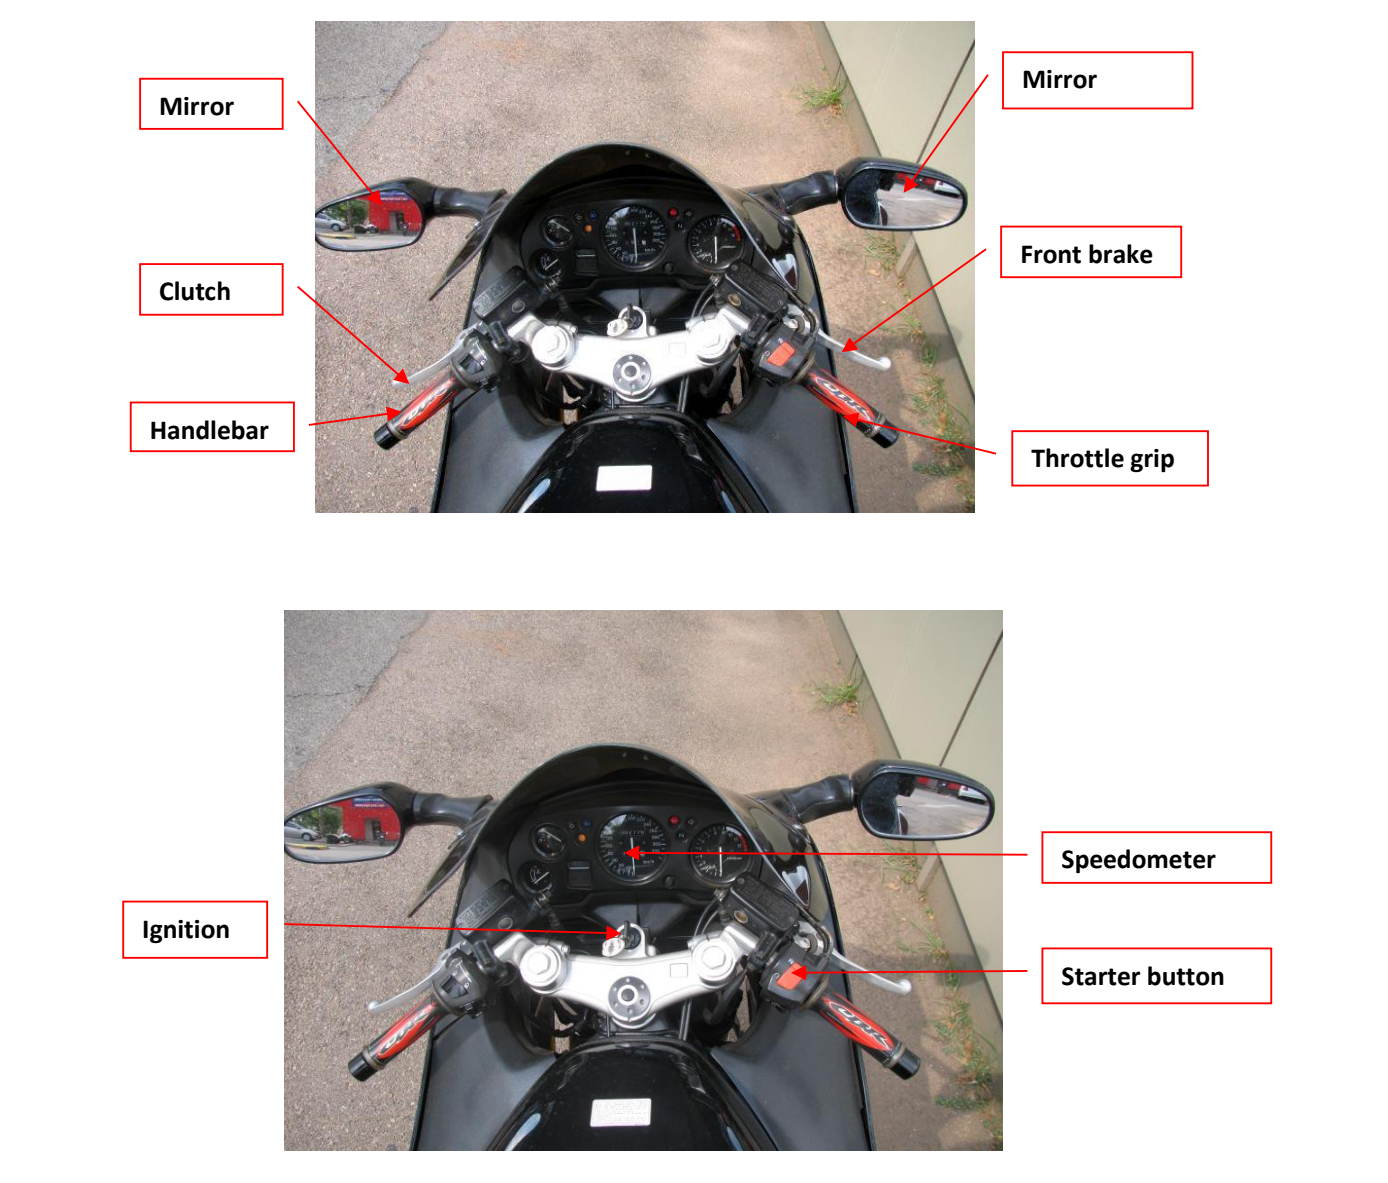
Locate the ignition, starter button and speedometer in the dashboard photographs. The speedometer is an instrument for reading speed; it is not the throttle. The ignition and starter are separately labelled controls, not the indicator switch.
The photographs and numbered table are complementary: some visible components have no test-control number. Learn both the physical component and the numbered control. The left hand operates the illustrated clutch lever; the front-brake lever and throttle grip are on the right.
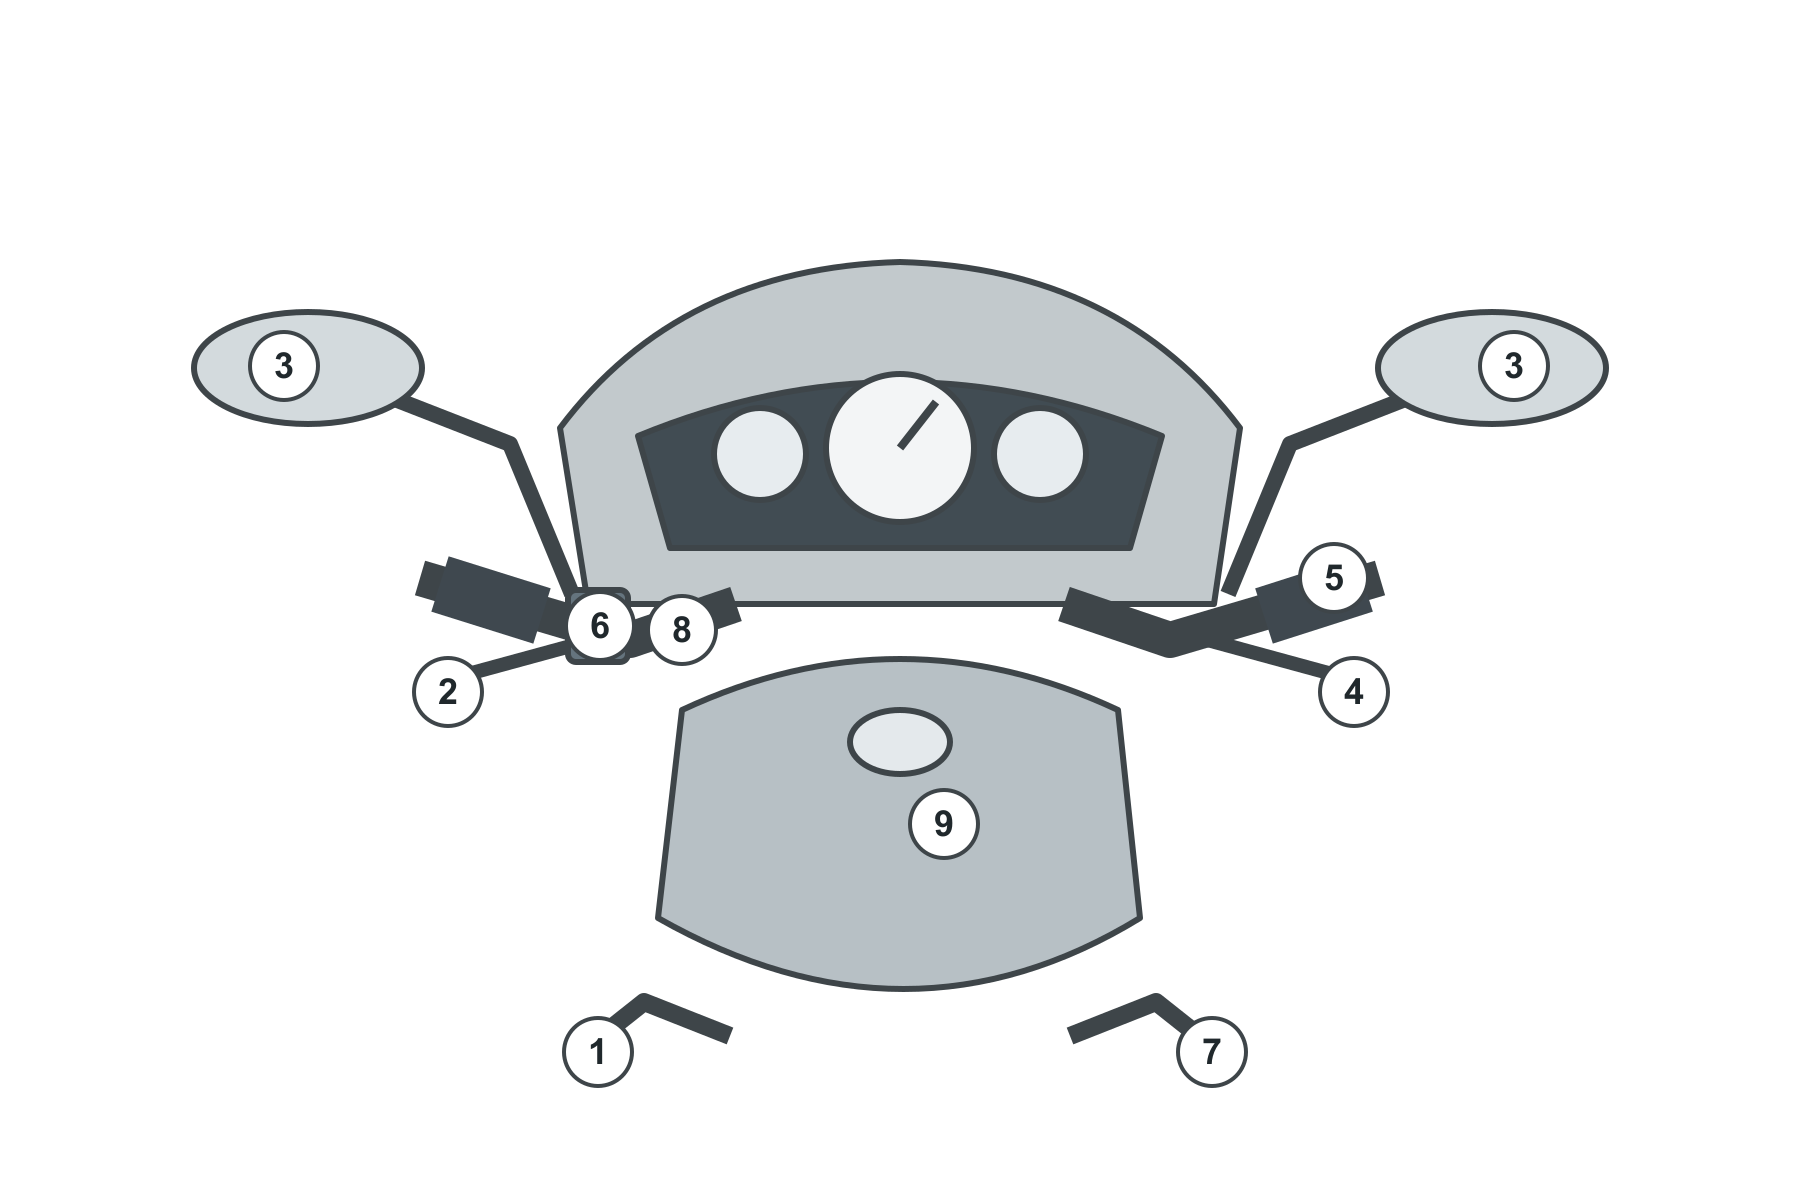
The numbered controls and their functions
- 1 - Gear lever: the illustrated foot control used to select a gear.
- 2 - Clutch: the left-hand lever that disengages the engine from the gearbox and is used with the gear lever.
- 3 - Left and right rear-view mirrors: observe traffic behind the motorcycle.
- 4 - Front brake: the right-hand lever applies the front brake and activates the stop lamp.
- 5 - Throttle: the right-hand twist grip controls engine speed and regulates fuel supply to the engine.
- 6 - Indicator switch: signals an intention to turn or change direction.
- 7 - Rear brake: the illustrated foot-operated brake; do not confuse it with the front-brake lever.
- 8 - Handlebars: control the direction of the motorcycle.
- 9 - Fuel tank: identify it in front of the seat; it is not a brake or a steering control.
Changing gears and controlling speed
A gear change involves the gear lever 1 and clutch 2 together. The lever selects the gear; the clutch disengages the engine from the gearbox. Naming only the throttle does not identify the gear-changing controls.
The throttle 5 increases or decreases engine speed. The manual’s complete speed-control combination is front brake 4, throttle 5 and rear brake 7. Reducing the throttle and applying a brake are different actions, even though both affect speed.
Stopping and stopping distance
To stop the motorcycle, the source pairs front brake 4 with rear brake 7. Immediately before a complete standstill, its combination also includes clutch 2: controls 2, 4 and 7. This distinguishes braking from the additional clutch action at the end of a stop.
Stopping distance becomes longer on a wet road, at a higher speed and when carrying a passenger. All three conditions increase the stopping distance in the source example. Do not assume the same stopping distance after changing any of these conditions.
Observation, signalling and changing direction
Mirrors 3 show traffic behind you, indicator switch 6 communicates your intention, and handlebars 8 change direction. These are different jobs: switching on an indicator does not turn the motorcycle, and looking in a mirror does not warn other road users.
For a sharp turn, the source identifies controls 1, 2, 3, 4, 5, 7 and 8: gear lever, clutch, mirrors, both brakes, throttle and handlebars. This is a set of controls involved in the manoeuvre, not an instruction to operate all of them simultaneously.
Worked situations and recap
Example: you want to signal a left turn while checking traffic behind. Use mirrors 3 to observe and the indicator switch 6 to signal. The handlebars 8 perform the steering; they do not replace the observation or signal.
Example: a question asks for the controls used to stop, then asks what is included immediately before standstill. The first answer is 4 and 7; the second is 2, 4 and 7. Read the stage of the action, not just the word “stop”.
Recap: identify all nine numbers without guessing from appearance; separate hand and foot controls; distinguish observation, communication, gear changing, steering and braking. Then explain why wet conditions, speed and a passenger change the stopping situation.