Route markers are a chain
Advance trailblazers point toward a route before you reach it. A transport trailblazer guides you toward a transport destination. A map-type trailblazer shows the route through a junction layout. Read the route number and arrow together, then look for the next sign in the chain.
Confirmation route markers reassure you after joining a route. Direction markers indicate the movement at the junction, while advance-direction markers give time to prepare. An overhead route marker relates the route to the appropriate lane or direction beneath it.
Alternative-route markers help you follow a signed alternative without improvising a turn from memory. Bicycle-route markers guide cyclists along the designated route; they do not automatically prohibit other road users in the way a regulatory cycle-only sign does.
- If the confirmation marker shows the wrong route, continue safely to a lawful place to correct the journey. Do not reverse back through a junction.
- The learner manual lacks artwork for several transport and route-marker entries. The original engineering diagrams and their published colour specifications are supplied in the later sections of this chapter.
Advance, at the junction, then confirmation
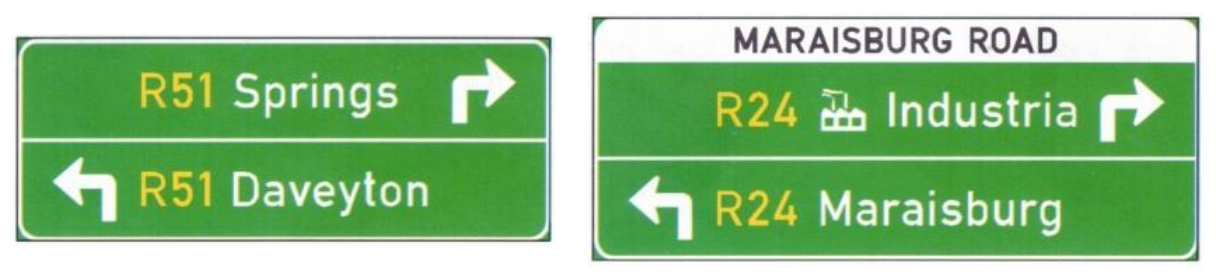
Stack-type advance-direction boards list destinations with their direction arrows before the junction. Stack-type direction boards place the direction at the turn. Fingerboards point toward a destination at the junction. A confirmation board beyond it lists the route/destinations and distances so you can check that you chose correctly.
Map-type advance-direction boards represent the layout, including unusual angles or roundabouts. Trace your approach into the diagram and find your intended branch before selecting a lane. An overhead direction board associates destinations and route numbers with particular lanes or movements.
An arrow pointing left on advance guidance tells you to prepare for the left turn at the indicated junction; it does not invite a turn into every earlier access. Use the board’s distance, layout and the actual intersection together.
Plan before the gore
The freeway exit sequence begins with pre-advance exit direction, followed by advance/supplementary exit guidance, exit direction and the gore exit marker. Use this sequence to identify the exit number and destination, signal and move safely into the exit lane before the split.
The gore is the area separating the exit from the continuing carriageway. If you miss the safe exit point, remain on your route and use a later lawful exit. Crossing the painted or physical separation is not a navigation correction.
At the end of the off-ramp, advance terminal signs give directions before the junction, and terminal direction signs give directions at the junction itself. Rural and urban layouts can differ. Freeway route-confirmation signs confirm the continuing route, while exit-sequence signs help you plan later exits.
Cross-route approaches and overhead lane diagrams
Cross-route advance signs prepare drivers on the road crossing the freeway. The near-side on-ramp sign gives the direction for the nearer entrance. For the far-side ramp, the advance sign gives notice before you reach it, and the direction sign marks its entrance. Check the route direction as well as its number so that you do not join the freeway travelling the wrong way for your destination.
Overhead freeway direction shows the lane/direction relationship before the split. Diagrammatic guidance can show lane additions, merges, divisions or required positioning. Trace your own lane through the diagram while still leaving time for a safe lane change.
The overhead lane-use signs combine overhead lane-use diagrams with regulatory symbols. The regulatory symbol controls use of that lane; it is not merely a picture of the traffic likely to be there. An overhead arrestor-bed exit sign directs a vehicle with brake failure to the emergency route, not to an ordinary freeway exit.
Original trailblazer and confirmation diagrams
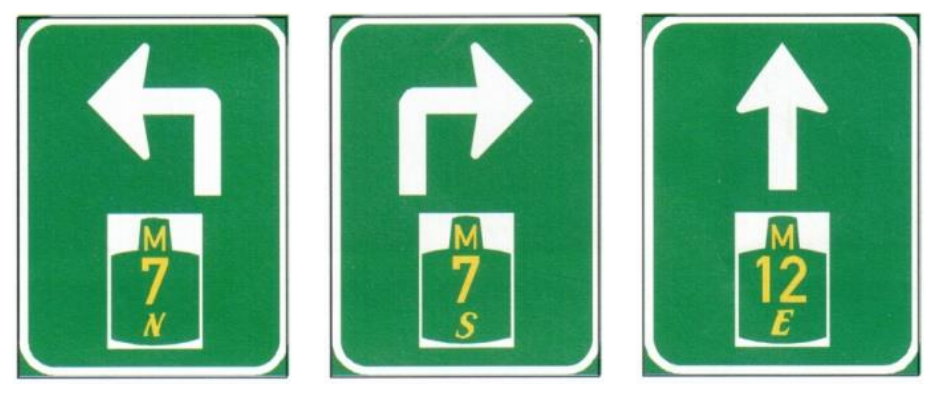
These full-colour examples come from the official sign-design manual. The original shapes, symbols, arrows and route numbers are retained. Read each symbol, route number and arrow together.
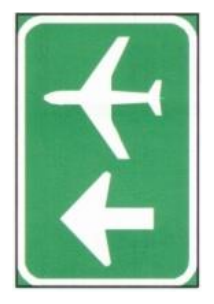
Transport trailblazers have a green background with white border, arrow and transport symbol. The arrow directs you at the junction toward the named type of transport terminal. Compare the transport symbol with the advance guidance so that you continue the intended route.
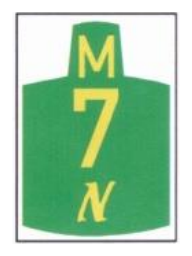
Confirmation markers identify metropolitan, regional, provincial and national routes. Their different outlines help distinguish route classes. Permanent versions use a white border/arrow, yellow legend and blue or green background as specified for the road context. Temporary versions use black border/arrow and legend on yellow. Read the number and direction rather than inferring your destination from the shape alone.
Direction, advance and overhead marker layouts
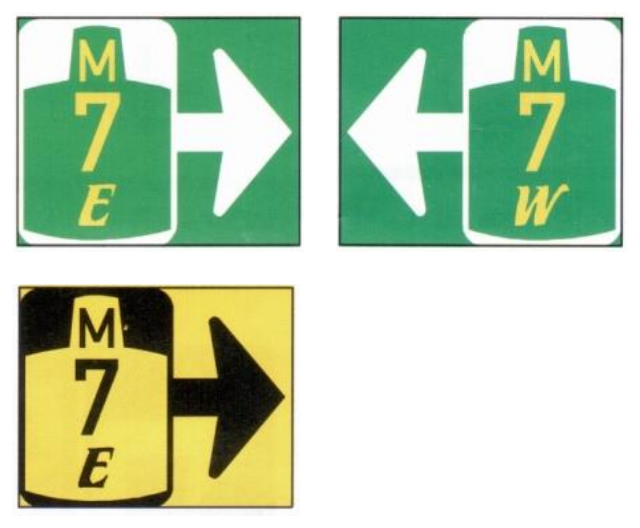
The original direction-marker drawings associate each route number with an arrow. A direction marker identifies the turn at the junction. An advance marker gives time to prepare for a route that turns or intersects ahead. An overhead marker places that advance information above traffic when roadside space is limited.
Permanent direction, advance and overhead markers use white borders and arrows, yellow route legends and green backgrounds in these examples. Temporary direction and advance markers use black borders, arrows and legends on yellow.
Trace the bend of the advance arrow and compare it with the actual junction. A straight arrow can confirm that the numbered route continues ahead; a bent arrow requires lane planning before the turn. The overhead example is guidance to position correctly, not permission to turn across a closed lane.

Off-ramp terminal guidance in its original drawing
Advance off-ramp-terminal signs give directions before the terminal to help select a lane. Direction signs at the terminal junction itself can be combined with the T-junction chevron. The original rural and urban diagrams show how a street-name strip may be added to the urban example.
The permanent direction panels have green backgrounds, white borders, arrows and destination names, and yellow route numbers. A street-name strip uses black letters on white. The chevron below the direction panel is red and white.
Select the correct lane while approaching the advance terminal sign, then follow the intended direction arrow at the terminal. If the destination was misread, stop or yield as the actual terminal control requires and choose a lawful onward route. Guidance never authorises crossing opposing traffic without giving way.

Advance and at-exit arrestor-bed diagrams
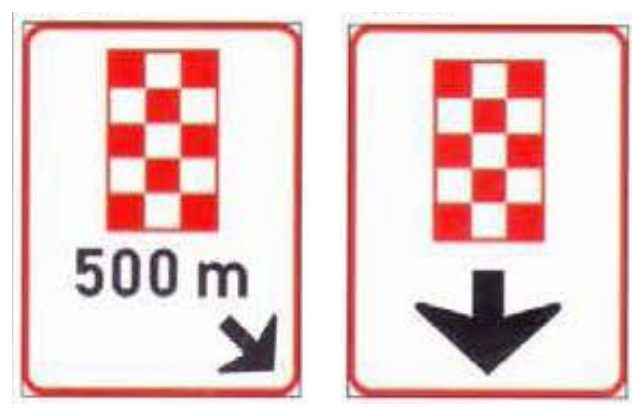
The advance arrestor-bed sign shows that an arrestor-bed exit lies ahead, with a distance and a directional arrow. The downward-arrow sign identifies the position of the exit with a downward arrow. Both use the arrestor-bed checker symbol, helping a driver with brake failure distinguish the escape facility from an ordinary exit.
The permanent overhead signs have a white background, red border and red-and-white checker symbol, with black arrows and text.
These are emergency escape directions. Keep the route clear; use it for the braking emergency for which it is provided rather than stopping there for a rest.